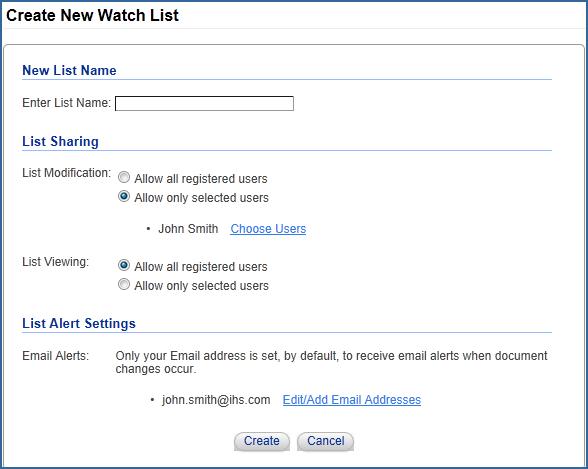
When you click the Watch Lists tab for the very first time, a message displays stating that you have not created any shared lists. Once you create a list, it is added to a drop-down menu that includes all of your company�s public lists.
Important Note: To create a list, you must register as a unique user. This allows the system to keep track of your individual searches and lists. IHS does not sell or rent online user information to other companies and you will not receive unwanted "spam" as a result of completing this registration form. For more information, please read the IHS Privacy Policy.
Creating a new list can be done by using the Create New List link.

To create a new list with the Quick List Creation page:
Go to the Watch Lists tab, and then click on the Create New List link.
Click the Create New List link.
In the New List Name section of the page, enter a name for your list, such as Project XYZ.
The List Sharing section of the page allows you to set modification/editing and viewing rights for your lists.
For List Sharing > List Modification, the modification rights default is set to Only selected users. This option gives list editing rights to those users you select and allows those users to add, delete, or update documents on the list. By default, you are given permission to modify your list. To grant modification rights to other users, click on the Choose Users link.
Click the check box next to registered individuals within your company to whom you want to grant modification rights, and then click the OK button.
For List Sharing > List Viewing, the rights default is set to All registered users, allowing all users registered under your company account to view the list. To allow selected users to view the list, change the List Viewing setting to Only selected users, and then click on the Choose Users link.
Click the check box next to registered individuals within your company that will be allowed to view the list, and then click the OK button.
The List Alert Settings section of the page allows you to set up users to receive email alerts whenever documents on your list are revised. By default, only your email address is set up to receive email alerts. To edit an existing email address or add a new email address, click the Edit/Add Email Addresses link.
Enter the email address for the individual that will receive email alerts, and then click Add.
Click the Remove link to delete an email address.
When you have finished editing or adding email addresses for List Alerts, click OK.
If you are satisfied with the List Name, List Sharing, and List Alert settings, click the Create button. Once your list is created, you can perform a search and add documents to your list.
Once your list is created, go to the Search tab, perform your search(es) and add the documents you want to your list with the Watch List (Add) link in the results list or when viewing the PDF image of the document.
Watch List (Add) link in the results:
Watch List (Add) link while viewing the document:
When you click on a Watch List (Add) link, a dialog box opens, allowing you to select which list you would like to put the document in. Select a list from the drop-down menu, and then click Submit, and then OK.
Related Topics